CLICK HERE FOR FREE BLOG LAYOUTS, LINK BUTTONS AND MORE! »

Saturday, January 8, 2011

National Tempura Day

January 7th was National Tempura Day. And so of course we had Tempura for dinner on Friday night.
First, let me say it was fantastic! Second, let me say it made a mess in my kitchen! And third, let me say I had to doctor the recipes quite a bit!
I will be making this again, if for no other reason than to measure better and get a more accurate recipe for my blog. And well, because it really was quite good.

So here are the recipes and a picture...


Tempura Batter by Setsuko Yoshizuka (from about.com)

1 egg
1 cup ice water
1 cup all-purpose flour, sifted (I ended up using more flour than this. But I forgot to measure how much, I actually used. So I will be making this again in order to get a more accurate recipe. But if you want to give this a try before I remake it, then just keep adding flour until you get a nice thick batter that will stick to your potatoes, or whatever it is that your making)

Beat an egg in a bowl. Add ice water to the bowl (I did not add the ice just the water). Add sifted flour in the bowl and mix lightly. Be careful not to over mix the batter.
(I doubled this batter recipe because I knew that I was going to be making a lot of food. This batter if very plain and will not add much flavor to your food, that's what they tempura dipping sauce is for, so if your not going to use the dipping sauce you may want to spice up your batter).

Tempura Potatoes by Setsuko Yoshizuka

3-4 potatoes
Tempura batter (see recipe above)
Oil for frying

Peel potatoes and slice to 1/4-inch thick (Next time I make these, I am going to slice the potatoes like steak fries instead of chunks). Soak potatoes slices in water for 15 minutes and drain well. Make tempura batter. Heat the oil to 340 degrees. Dip potatoes in the tempura batter. Deep fry them until crisp (I deep fried them for about 7 minutes). Serve with tempura dipping sauce (recipe at the bottom).
(I also used this same method for making carrots and they were wonderful. I cooked the carrots right along with the potatoes for about 7 minutes. I'm pretty sure you could use this batter on just about anything).

Tempura Shrimp by Setsuko Yoshizuka

12 large shrimp (I used a pound of medium shrimp)
Tempura batter (see first recipe)
Oil for frying

Remove heads and shells from shrimp without removing tails (I can buy my shrimp already like this). De-vein the shrimp. Make two or three incisions on the stomach side of the shrimp to straighten them. Lightly press the back of the shrimp to straighten (this is an excellent photo show that walks you through how to do this). Remove dirt from the tails of shrimp, using a knife. Dry shrimp on paper towels. Make tempura batter. Heat oil to 340 degrees. Flour shrimp before dipping in tempura batter. Dip shrimp in tempura batter. Fry the shrimp until crisp (mine took about 2 to 3 minutes).

Tempura Dipping Sauce from Cooking at a Glance (cooking.com)

3 tablespoons soy sauce
2 tablespoons orange juice (I used 3 tablespoons)
2 tablespoons dry sherry (since this is not cooked and I was serving it to my children I did not add this)
1 tablespoon green onion, finely chopped
1 teaspoon sugar (I used 2 teaspoons sugar)
1 teaspoon sesame seeds (I did not add these)
Few splashes bottled hot chili sauce (I did not add this either)

In a small mixing bowl combine soy sauce, orange juice, sherry (if using), green onion, sugar, sesame seeds, and hot chili sauce. Set aside to use for dipping tempura foods.
(I doubled this recipe and had none leftover, which worked out good because I had no leftovers from this meal at all)

Again, I will say that this was very good. We enjoyed trying this new food and Delaney has requested this for her birthday dinner.
If you do give this a try please let me know how you and your family liked it!
Friday, January 7, 2011

Tyler's Birthday Dinner

So January 6th, was National Shortbread Day and we did not celebrate this day. WHY? you may ask... well, it's not because we do not like shortbread. It's because we are drowning in sweets at our house. We have Caramel Apple Cake, we have Cream Puffs, and we have Lime Cheesecake. So I am going to save the shortbread for another day.

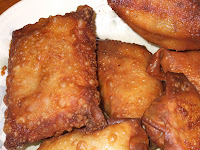
My best friend (Tammy) has asked me to post my Egg Roll recipe and so that is what I'm going to post today.

So here is the recipe and a picture....

Best Egg Rolls by Angela Hamilton (Allrecipes.com)


1 pound ground pork
1 teaspoon ground ginger (I also add another teaspoon to the coleslaw mixture)
1 teaspoon garlic powder (I also add another teaspoon to the coleslaw mixture)
1 quart peanut oil for frying (I don't use peanut oil, I use whatever is already in my deep fryer)
2 tablespoons all-purpose flour
2 tablespoons water
2 cups shredded cabbage
2 ounces shredded carrots
(Instead of using the cabbage and carrots and I just buy a bag of coleslaw mix)
8 egg roll wrappers

Season pork with 1 teaspoon ground ginger and 1 teaspoon garlic powder; mix thoroughly. Heat mixture in a medium skillet, stirring until pork is cooked through and no longer pink. Set aside.
Heat oil to about 375 degrees. While oil is heating combine flour and water in a bowl until they form a paste. In a separate bowl combine coleslaw mix, cooked pork mixture, and I add another teaspoon of ground ginger and garlic powder. Mix all together.
Lay out one egg roll wrapper with a corner pointed toward you, Place about a 1/4 to 1/3 cup of the cabbage mixture on the egg roll wrapper (in the middle) and fold corner up over the mixture. Fold left and right corners toward the center and continue to roll. Brush a bit of the flour paste on the final corner to help seal the egg roll.
Place egg rolls into heated oil and fry, turning occasionally, until golden brown. Remove from oil and drain on paper towels or rack.

These really are quite amazing! If you need me to post a few pictures of how to actually wrap them up let me know. I'll be more than happy to do that!

Thursday, January 6, 2011

National Whipped Cream Day

January 5 is not only my oldest son's birthday but it's also National Whipped Cream Day. So in honor of both Tyler and National Whipped Cream Day I made Luscious Lime Cheesecake. This cheesecake was amazing (if you like your desserts a little sour, which my son does)!

So here is the recipe and a picture...

Luscious Lime Cheesecake by Paula Deen

(Sorry about this picture. I will try and get a better one today)

1 (18 1/4-ounce) package yellow cake mix
4 eggs
1/4 cup vegetable oil
2 (8-ounce) packages cream cheese, at room temperature
1 (14-ounce) can sweetened condensed milk
2 teaspoons grated lime zest
1/3 cup fresh lime juice
1 teaspoon vanilla
2 cups heavy cream, whipped with 1/2 cup sugar (I used powdered sugar) until stiff. (IT HELPS IF YOU HAVE CHILLED YOUR BOWL AND BEATERS IN THE REFRIGERATOR . I usually chill mine for at least an hour)
Lime slices, for garnish (I forgot those)

Preheat oven to 300 degrees. Reserve 1/2 cup dry cake mix. In large bowl, combine remaining cake mix, 1 egg, and oil. Mix well (mixture will be crumbly). Press evenly in bottom and 1 1/2 inches up sides of greased 13 x 9-inch pan. In same bowl, beat cream cheese until fluffy. Beat in condensed milk until smooth. Add remaining eggs and reserved cake mix and beat 1 minute at medium speed. Stir in lime zest, lime juice, vanilla. Pour into prepared crust. Bake for 50 to 55 minutes or until center is firm (mine took 50 minutes). Cool to room temperature. Chill thoroughly. Spread whipped cream over top. Cut into squares to serve. Garnish with lime slices. (I didn't spread the whipped cream over the entire cake because I was not sure it would hold up. I am going to spread it over today and see how it does.)

The crust on this cheesecake was amazing! And the fact that you do not have to use a Springform pan appealed to me too. This is a very easy recipe and you can substitute cool-whip for the whipped cream if you want to make it even easier.

This is the birthday boy licking the beater (after I made the homemade whipped topping). He loved his birthday meals and dessert!
One of our family traditions is that on your birthday you get to pick everything we eat that day. So for his 15th birthday Tyler picked Eggs for breakfast, fish sticks for lunch, and orange chicken with homemade egg rolls for dinner. He didn't get to pick dessert because I wanted to try this new recipe out (and I knew that he would love it). YES, the recipes for orange chicken and egg rolls are coming!

I had a lot of lime zest left over so I did a goggle search to find out what to do with it and this is what I found out.
Zest lime peels and allow the zest to dry at room temperature for several days. Place the dried lime zest in a small glass jar and keep it at room temperature in a cupboard. (Found this information on ehow.com).
I have the lime zest sitting out right now and I will let you know how it goes.


Wednesday, January 5, 2011

National Spaghetti Day

January 4th was National Spaghetti Day! I love spaghetti and meatballs but I do not like all the work of making meatballs (and I'm not very good at it either). So I usually just fry up the hamburger and throw it in the sauce, NO MEATBALLS. But I could not cheat on National Spaghetti Day. So I went looking for an EASY meatball recipe, and I found it! These meatballs were delicious and easy. Never again will my family have to settle for meat sauce instead of meatballs.

So here is the recipe and the pictures....

Italian Spaghetti an Meatballs by Etta Winter, The Taste of Home Cookbook


2 cans (28 ounces each) diced tomatoes, undrained
1 can (12 ounces) tomato paste
1 1/2 cups water, divided
1 tablespoon sugar
2 tablespoons brown sugar (this is my own addition as we like our spaghetti sauce sweet)
3 tablespoons grated onion
1 1/2 teaspoons dried oregano
2 1/2 teaspoons salt, divided
1 teaspoon minced garlic, divided
3/4 teaspoon pepper, divided
1 bay leaf
6 slices day-old bread, torn into pieces (I used the rest of the French bread that I made on Sunday. I will make sure that I have leftover homemade bread for this recipe every time)
2 eggs, lightly beaten
1/2 cup grated Parmesan cheese
1 pound ground beef (I used 1 1/2 pounds)
Hot cooked spaghetti
Additional Parmesan cheese

In a Dutch oven, combine the tomatoes, tomato paste, 1 cup water, sugar, grated onion, oregano, 1-1/2 teaspoons salt, 1/2 teaspoon garlic, 1/2 teaspoon pepper and bay leaf. Bring to a boil. Reduce heat and simmer, uncovered, for 1-1/4 hours.
Meanwhile, soak bread in remaining water (next time I am going to soak the bread in milk instead of water). Squeeze out excess moisture. In a large bowl, combine the bread, eggs, Parmesan cheese, and remaining salt, garlic and pepper. Crumble beef over mixture and mix well. Shape into 1-1/2-inch meatballs.
Place meatballs on a greased rack in a shallow baking pan. Bake, uncovered, at 400 degrees for 20 minutes or until no longer pink (mine took exactly 20 minutes). Transfer to spaghetti sauce. Simmer, uncovered until heated through, stirring occasionally. Discard the bay leaf (I discarded the bay leaf before I added the meatballs so it would be easier to find). Serve over spaghetti with additional Parmesan if desired.


YES, that is homemade garlic bread that you see on the plate and YES I will be posting that recipe soon!

Monday, January 3, 2011

Chocolate Filled Cherry Day

January 3rd is Chocolate Filled Cherry Day and no matter where I looked I could not find a recipe for that. (So if you have one please share it with me, PLEASE!)

So since I did not have anything to make to go along with today's food celebration I decided that I would share the recipe for the amazing soup that I made on Saturday for lunch.

So here is the recipe and a picture....

The Lady's Chicken Noodle Soup by Paula Deen

One 2 1/2 to 3-pound fryer, cut up
3 1/2 quarts water (Next time I will use more than that, probably about 5 quarts)
1 onion, peeled (I also diced mine as I wanted to leave it in the soup)
1 1/2 to 2 teaspoons Italian Seasoning (I used 2 teaspoons)
1 teaspoon lemon-pepper seasoning
3 cloves garlic, minced
4 bay leaves
3 chicken bouillon cubes
Salt and pepper to taste

Add all ingredients to a pot. Cook until chicken is tender, about 35 to 45 minutes (I cooked mine about 35 minutes). Remove chicken from pot and set aside to cool. Remove and discard bay leaves and onion (I left the onion in and thought it was a great addition to the soup). You should have approximately 3 quarts of stock. When chicken is cool enough to touch, pick bones clean, discarding bones, skin, and cartilage. Set chicken aside. For the next step, you will need:

2 cups sliced carrots
2 cups sliced celery, with leafy green tops (I did not add this as I do not care for celery)
2 1/2 cups uncooked egg noodles (next time I make this I will be using homemade noodles)
1/3 cup grated Parmesan Cheese (the recipe says this is optional but I didn't really believe that)
3/4 cup heavy cream (again the recipe says this is optional, YEAH RIGHT)
1/3 cup cooking sherry
Salt and pepper to taste

Bring stock back to a boil, add carrots and cook for 3 minutes. Add celery and continue to cook for 5 to 10 minutes (since I did not add the celery I just cooked the carrots for 13 minutes). Add egg noodles and cook according to directions on package. When noodles are done, add chicken, cheese, cream, and sherry. Cook for another 2 minutes. Adjust seasoning if needed (mine did not need anything) by adding salt and pepper.

Again, let me say that this soup was delicious! I already have plans to make it again this month. And all of my children asked for the leftovers the next day. I would highly recommend giving this soup a try! I don't think you'll be disappointed.

Sunday, January 2, 2011

National Cream Puff Day

Well, today January 2nd is National Cream Puff Day.

I have never made cream puffs before and was a little nervous about giving them a try. But I accepted the challenge and was quite surprised, they really are not that difficult to make. I used a recipe I found in my Taste of Home cookbook and they were not only very tasty but looked perfect too.
My huband and my boys enjoyed them very much. My daughter (Delaney) is not feeling well, so I saved her one to try tomorrow. I thought they were pretty good, but seemed to be missing something. So I will be making this recipe again and I will be trying to figure out that missing ingredient. My best friend (Tammy) maybe on to something when she asked if I was going to drizzle them with chocolate.
So here is the recipe and some pictures too...

State Fair Cream Puffs by Ruth Jungbluth (The Taste of Home Cookbook)


1 cup water
1/2 cup butter
1/4 tsp salt
1 cup all-purpose flour
4 eggs
2 tablespoons milk (I only use whole milk when baking)
1 egg yolk, lightly beaten (I just whisk with a fork)
2 cups heavy whipping cream
1/4 cup powdered sugar
1/2 teaspoon vanilla extract
Additional powdered sugar

Preheat oven to 400 degrees. In a large saucepan, bring water, butter and salt to a boil over medium heat. Add flour all at once and stir until a smooth ball forms. (You need to stir it quickly until the mixture leaves the sides of the pan and forms a ball).
Remove from the heat; let stand for 5 minutes. Add eggs, one at a time, beating well after each addition. Continue beating until mixture is smooth and shiny.
Drop by 1/4 cupfuls (I used a large cookie scoop) 3 inches apart onto a greased baking sheet (I used my Pampered Chef stone so I did not have to grease the baking sheet). Combine milk and egg yolk; brush over puffs. Bake at 400 degrees for 30 to 35 minutes or until golden brown (mine took the entire 35 minutes). Immediately remove to wire racks. Immediately cut a slit in each for the steam to escape; cool.
In a chilled large mixing bowl (I chilled my bowl and beater for 1 hour), beat cream until it begins to thicken. Add sugar and vanilla; beat until almost stiff (I beat mine until it was stiff as I wanted my cream to stand up more).
Split cream puffs; discard soft dough from inside (I did not do this. I just left them the way they were). Fill the cream puffs just before serving. Dust with powdered sugar. Refrigerate leftovers.

This is a picture of my cream puffs waiting to be filled.
So stay tuned for me to try these again with some chocolate next time!
And if you give these a try let me know how you liked them!

Saturday, January 1, 2011

Did You Know....

Did you know that just about everyday has some kind of food celebration to go with it? It's quite amazing really and a little funny too. So I though one of the things that I would like to do this year is celebrate the food holidays (the ones that I can). And share them with you along with the recipes that I'm using.
So today January 1st is Apple Gifting Day.
Now, I am not going to gift a bag of apples to anyone (that would be kinda strange) so I decided to make something with apples and gift that.
So I made Caramel Apple Cake with Caramel Topping from The Lady & Sons cookbook. Let me tell you this cake is amazing. It is very RICH! So if you do decide to make it (and I would highly recommend that you do) cut the pieces small!
What I'm going to do is give you the recipe just as it's printed in the book and then I'm going to tell you what I will do different next time (and OH YES there will be a next time). Then once I have made it again with my new changes I will post again and let you know how the changes worked out.
OK so here is the recipe and the pictures...


Caramel Apple Cake with Caramel Topping By Paula Deen

2 1/2 cups sugar
3 eggs
1 1/2 cups vegetable oil
3 cups all-purpose flour
2 teaspoons vanilla
1 cup chopped walnuts (next time I will double the walnuts and leave them in bigger pieces)
2 1/2 cups diced apples, canned or fresh (I used fresh apples sliced pretty thin)

Preheat oven to 350 degrees. Cream together sugar, eggs, and oil. Add flour; mix together until well blended. Blend in vanilla. Stir in nuts and diced apples. Spread into a lightly greased and floured 13 x 9-inch baking dish; bake for 45 to 60 minutes (mine took almost the entire 60 minutes). Cake is done when toothpick inserted in center comes out clean. When cake is done, punch holes in it with a knife and pour topping over. (When I took the cake out of the oven the toothpick was clean but the cake did not look done, so I was a little nervous. But the cake was done and tasted amazing)

Caramel Topping
3/4 pound (3 sticks) butter (this is a Paula Deen recipe after all)
2 cups brown sugar (Packed)
1/4 cup milk (I only use whole milk when I bake)

Heat all ingredients together over medium heat. Bring to a boil, stirring constantly. Let boil for about 2 minutes. Pour over warm cake. (I stared making the topping about 15 minutes before the cake was done, next time I'll probably start about 20 minutes. I let this set awhile before cutting it as I think it would have made a huge mess if I had cut it right away. I gave the caramel a chance to soak down into the cake. So I would recommend making this in the early afternoon if you were going to serve it in the evening)


Now the gifting part... I'm going to be taking about half the cake to church with me tomorrow and "gifting" it to my best friend and her family. I hope they enjoy it as much as we did!

As a side note my oldest son, Tyler, suggested that this be served with vanilla ice cream.
HHHMMM I'm thinking he may be on to something there.

I made a few other very yummy things today... homemade chicken noodle soup and homemade french bread. So stay tuned for those recipes and pictures coming soon!
Related Posts Plugin for WordPress, Blogger...